从0到1创建一个mcp server
官方的MCP框架
可以简化代码
https://github.com/modelcontextprotocol/python-sdk
实操步骤
1、pycharm创建项目
2、pip install mcp
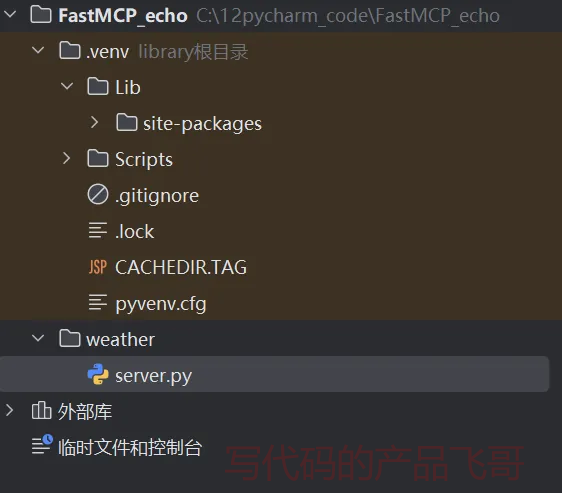
3、创建如下的目录和文件

4、server.py文件内容
如下的例子https://dev.qweather.com/ 注册,申请一个key ,每天有1000次免费的调用的。
注意如下替换成自己的key
from typing import Any
import httpx
from mcp.server.fastmcp import FastMCP
import asyncio
# Initialize FastMCP server
mcp = FastMCP("weather")
# Constants
NWS_API_BASE = "https://devapi.qweather.com/v7/weather"
USER_AGENT = "weather-app/1.0"
key = "XXXX" # 输入你自己的key
async def make_weather_request(url: str) -> dict[str, Any] | None:
    """
        访问网站
    """
    headers = {
        "User-Agent": USER_AGENT,
        "Accept": "application/geo+json"
    }
    async with httpx.AsyncClient() as client:
        try:
            response = await client.get(url, headers=headers, timeout=30.0)
            response.raise_for_status()
            return response.json()
        except Exception:
            return None
@mcp.tool()
async def get_weather(latitude: float, longitude: float) -> str:
    """Get weather forecast for a location.

    Args:
        latitude: Latitude of the location
        longitude: Longitude of the location
    """
    # First get the forecast grid endpoint
    points_url =  f"{NWS_API_BASE}/now?location={longitude},{latitude}&key={key}"
    points_data = await make_weather_request(points_url)

    if not points_data:
        return "Unable to fetch detailed forecast"
    now = points_data['now']
    weather_info = (
        f"观测时间: {now['obsTime']}\n"
        f"温度: {now['temp']}°C\n"
        f"体感温度: {now['feelsLike']}°C\n"
        f"天气: {now['text']}\n"
        f"风向: {now['windDir']}\n"
        f"风力等级: {now['windScale']}\n"
        f"风速: {now['windSpeed']}km/h\n"
        f"湿度: {now['humidity']}%\n"
        f"降水量: {now['precip']}mm\n"
        f"气压: {now['pressure']}hPa\n"
        f"能见度: {now['vis']}km"
    )
    return weather_info
if __name__ == "__main__":
    # Initialize and run the server
    mcp.run(transport='stdio')
    # weather_data = asyncio.run(get_weather(22.5,114))
    # if weather_data:
    #     print(weather_data)
以上的代码不需要在pycharm的终端窗口执行 uv install server.py
5、cline的mcp server配置为:
{
  "mcpServers": {
    "weather": {
      "command": "uv",
      "args": [
        "--directory",
        "C:\\12pycharm_code\\FastMCP_echo\\weather",
        "run",
        "server.py"
      ],
      "disabled": false,
      "alwaysAllow": []
    }
  }
}
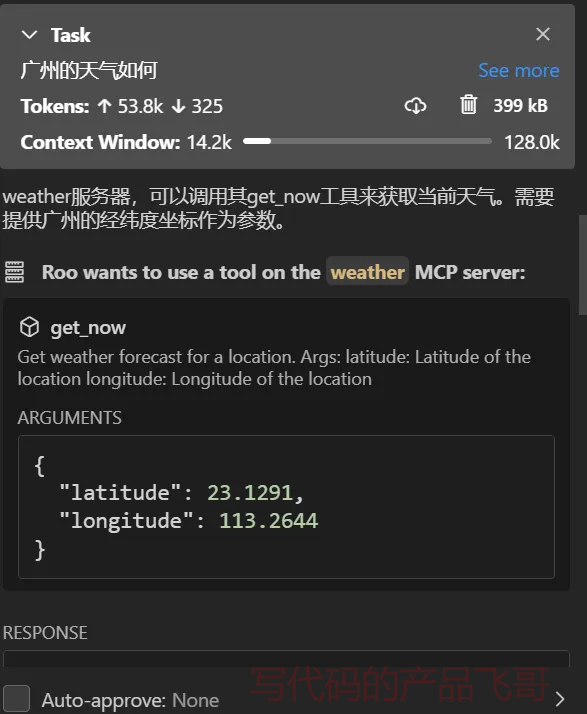
6、在roo code就可以提问了
--B站/抖音:写代码的产品飞哥
--分享运营真实案例,用编程创造自己的产品
0 条评论
暂无评论,快来发表评论吧
请登录后再发布评论,点击登录